 Tattoo Stencil
Design notes
Check the tighter inside folds first when comparing versions at different widths.
Artwork source
Vector line art from the Tattoo Stencil collection.
 Buy me a coffee
Botanical · Tattoo stencil design
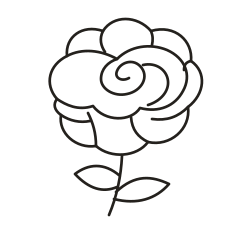
A broad tea rose with nested petal folds and a rounded outer edge.
Check the tighter inside folds first when comparing versions at different widths.
Vector line art from the Tattoo Stencil collection.
Start with the broad cup of the flower and work inward. The outside contour makes several rounded steps before meeting the lower stem, and the center rolls into a short curl. Around that curl, a curved band separates the inner group from the petals on the outside. The two leaves are lower on the page, so changing their width will affect the overall balance less than changing the bloom. Compare this rose with the Wild Rose if you want to see what the center detail adds at the same scale.
When the smallest folds are hard to follow on paper, make a second version that removes only a short inner stroke. Read both proofs from the outer petal to the curl. If your eye follows that route on the simpler copy, you can keep the extra fold in the reference image for discussion. Check both the widest part of the flower and the full height before deciding how the stem should sit.
This rose needs room for a broad rounded bloom above a relatively short stem. On a paper shoulder or upper-arm mockup, line up the top of the outer petal with the top of the space, then see where the lowest leaf falls. A mockup that fits the blossom can still place the lower leaves too close to adjacent artwork. Try shifting the whole drawing before reducing the flower, since a small reduction changes the spacing inside all of its folds.
Use a piece of tracing paper to separate the outside petal edge from the thickest-looking part of the interior pattern. Trace just those two boundaries. Put the tracing beside the complete flower and see where the impression of a layered cup comes from. If it is already clear in the two-boundary sketch, put back a single interior crease at a time and compare the effect. That test gives a simpler alternative to keeping every fold in a reduced paper study.
Locate the short stroke descending from the top right lobe toward the surrounding curved band. Compare its end with the nearest turn of that band. The pale space there separates a surface crease from the boundary of a larger petal. If a heavier draft joins them, leave the outer lobe and the large curved band intact, then remove that short crease in a second version. The center curl can keep its shape while the larger fold becomes easier to follow.
Follow the line from the tip of the flower or leaf to the end of the stem. Where petals overlap, decide which edge describes the front petal. If both edges merge in the proof, keep the stronger boundary and try a simpler version of the smaller fold. Leave the outline in proportion.
Check a printed copy at the intended bloom width from the left outside contour toward the inner curl. Pay attention to the narrow area where the curved band and the inner arcs sit close together on the right. If they appear as one dark track, compare a copy with fewer folds at the same width before deciding to enlarge the bloom. This isolates the effect of the edit. Keep the first copy beside the simpler version so an artist can see the fuller petal arrangement.
For an enlarged print, choose a sheet or tile arrangement that keeps the entire central curl together wherever possible. The curl and the band around it have similar arcs, so a cut there makes it easy to match one curve to the wrong one. If the seam has to cross the flower, use the distinctive turn on the outer petal edge as one alignment point and a second, separate fold as another. Leave both visible while checking the join against the whole drawing. See the actual-size printing guide for calibration and page alignment.
Keep the full flower proof and the reduced-fold proof under names that identify the same bloom width. Record the point where the stem exits the rounded cup and indicate which leaf points toward the chosen side on the mockup. Add a close photograph of the center only if it helps show which crease you removed. Send the complete outline too, since the center crop alone gives the recipient no reliable way to compare the stem direction or the amount of space around the cup.