 Tattoo Stencil
Design notes
The overlap explains the angle. Keep the foreground edge distinct from the wing behind it.
Artwork source
Vector line art from the Tattoo Stencil collection.
 Buy me a coffee
Fine Line · Tattoo stencil design
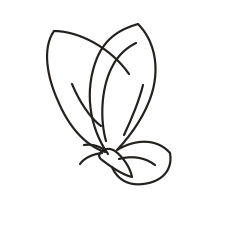
A butterfly in a narrow side view with overlapping upright wings and sparse fine contours.
The overlap explains the angle. Keep the foreground edge distinct from the wing behind it.
Vector line art from the Tattoo Stencil collection.
This vector illustration uses the folded-wing pose as its subject. A closed-wing photograph in the University of Florida giant swallowtail profile shows how differently a resting butterfly can read from a spread-wing specimen. The overlapping shapes here are a stylized side view with sparse contours, independent of that photographed species.
University of Florida photograph of a closed-wing butterfly
Compare a vertical forearm mockup with a shorter version on the upper arm. Find the direction that leaves the upright wing visibly distinct from the lower wing and keeps the body from reading like a continuation of the wing edge.
Ask the artist which overlap should have the stronger contour and which short interior line can remain light or be omitted.
The folded silhouette rises above a small, diagonal body. One tall wing moves toward the left edge while the other stands more upright. The lower lobe bends out to the right, which adds width near the base rather than across the whole shape. Compare it with the Side Butterfly at the same height if you are deciding between two directional references. Put each proof on a paper strip and see how much open area remains around the outer tips.
On a small print, check where the front wing meets the rear wing above the body. Use a scrap of paper to cover the light inner curves for a moment. If the outer shapes still read, try reducing just one of those curves in the draft and print the two versions at equal size. Pay attention to which way the antennae point when comparing orientation. The short diagonal body gives you a second check if a mirrored proof is turned on the table.
Place the tall part of this side view along a narrow forearm paper strip and keep room at the lower end for the rounded lobe that extends to the right. Try the same print with the top leaning slightly toward the open edge of the strip. Compare the full lower width in both positions. The tip of the back wing and the lobe describe different parts of the silhouette, so keep both visible while judging which angle fits the space.
Draw a narrow rectangle around just the tall folded wings, then extend the rectangle to include the lower lobe. The difference shows why the two upright tips alone do not describe the footprint. Try moving the full paper proof up or down on the mockup until the wider part of the available space lines up with the lobe. Compare that position with one centered on the tall wing. This helps you decide whether a shift solves the problem before changing the proportions.
The foreground wing has a long inner curve sweeping from near the top down toward the body, with a shorter curve beside it. At a hypothetical 60 mm artboard width, the SVG stroke scales to roughly 0.55 mm digitally. Inspect the space between the long inner curve and the outside wing line on your paper proof. If it closes, shorten the inner curve from its lower end and preserve the outer sweep that separates the folded wings.
Choose one narrow gap that matters to the subject, then follow the adjacent lines through the preview. The gap can be more informative than the nominal thickness of either stroke. Keep the main contours and compare one version with fewer inner marks. This makes it easier to see whether the outline or the interior detail needs attention.
Look just above the body where the rear outline approaches the edge of the foreground wing. Then look below it, where the smaller lobe turns outward. If the first junction turns dark but the lobe is clear, compare a copy with the light inner curve on the rear wing reduced to a shorter accent. Keep the silhouette the same on both proofs. That lets you tell whether the extra line helps explain the angle or merely adds weight near the overlap.
Check that the paper layout leaves room beyond both tall tips and the right edge of the lower lobe. A crop that trims either tip can hide the distinction between the foreground and rear wings. For a tall version that needs two sheets, try to keep the wing junction and body together, then check a point on each outer edge as you align the join above. Compare the assembled silhouette with the full page preview before interpreting a new bend as part of the artwork. See the actual-size printing guide for calibration and page alignment.
On the approved proof, mark the side where the small lobe projects and draw a light arrow beside the angled body. Together they describe the chosen direction more clearly than the taller wing alone. Note the full height and maximum lower width when sending the file. If there is a mirrored alternative, include the same orientation marks on a photograph of each print. This gives the recipient a check even if a preview crops off the antennae or turns the paper sideways.