Motif background
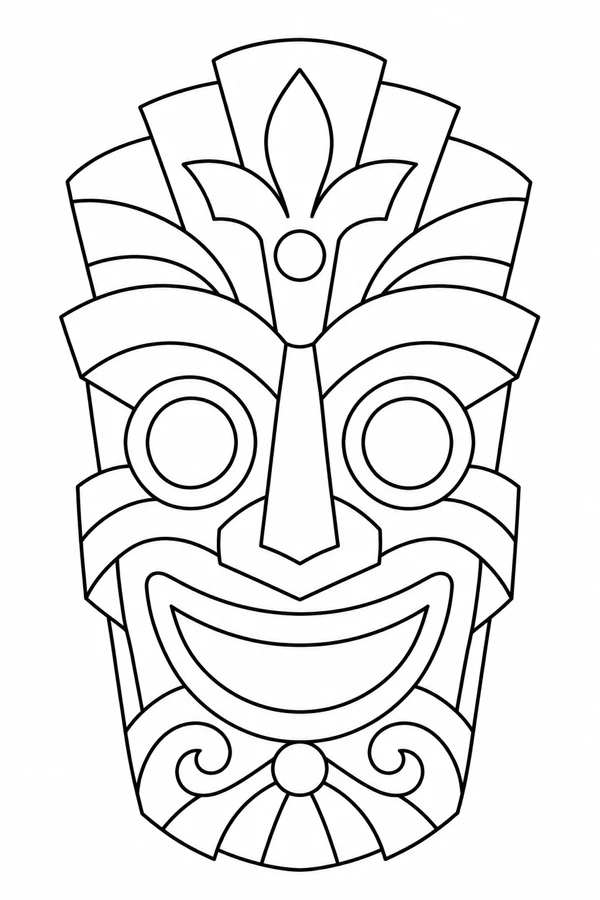
The stepped crown and wide grin are an invented decorative face. The Smithsonian’s American history collection shows how face-shaped serving ware became a feature of twentieth-century tiki bars in the United States. That display offers context for the commercial design vocabulary evoked here. The pictured asset is a modern illustration with its own arrangement of eyes, teeth, and crown.
Smithsonian collection of American tiki glasses
Placement to compare
Test a long, rectangular paper cutout against a forearm mockup. Mark the center between the eyes and see whether both square corners still have room when the outline turns toward either side.
Linework and shading to discuss with your artist
Ask your artist to compare the broad liner contours with lighter interior divisions. Check the white spaces beside the eyes and between the teeth before settling on the amount of black fill.
Needle grouping terminology from Cheyenne
A stacked face with a rectangular footprint
The round eyes sit between a stepped crown and a crescent-shaped grin. From a distance the face reads through three large shapes. Up close, the fan segments above it and the curls at the chin reward a longer look. Compare the Palm Face if you want the top to taper into open space, or the Sun Medallion if you want the design to spread evenly away from the middle. This invented mask has the flattest sides of the three, so it works as a reference for a panel between two fairly straight borders.
For a narrow placement sketch, draw the available height and width as a box and put the eyes near its visual middle. That lets you judge whether the crown and chin have similar room before any surrounding artwork is added. If the crown feels too busy next to an existing design, try a draft that keeps the central petal and the outside steps but drops some of the fan divisions. The small bottom curls can also be considered separately. The eyes and grin should still carry the expression in either version.
Compare the shape at the size you plan to use
Cut around the entire mask, including the stepped fan and the curved chin, and mark two levels on the back of the paper where the eyes and mouth sit. Slide the copy up and down a forearm outline so you can see whether the flared crown or the projecting cheeks set the maximum width. Try a second copy with the same width shifted slightly off center. The bands along the sides help show whether a change in position makes one cheek seem narrower than the other.
A comparison checklist for Tiki-Inspired Mask
- Keep the eye circles and border aligned when marking the height and width of the invented motif.
- Compare the pale space around the eyes on both copies. Preserve that space if reducing the interior divisions.
- Keep the top edge marked on the proof so that the geometric face stays upright while comparing placements.
Trace the horizontal bands on one copy and the principal facial features on another. Hold the two copies next to each other and ask which edges locate the cheeks without competing with the eyes. The stepped silhouette should still locate the crown if you drop a short band beneath it. Compare this with dropping a line below the mouth. Those omissions affect different parts of the face, so make them on separate drafts and keep the outside frame constant.
Decide which details belong in the linework
Compare the enclosed shapes on two levels. The ring around each eye separates the pupil area from the bands running across the cheeks. Lower down, the smile has its own smaller outline inside the jaw. Keep both pairs of boundaries distinct before deciding how heavy the outside frame should be. For a cleaner draft, remove a short divider from the fan above the eyes before altering the eye rings or the corners of the smile. Those openings contribute more to the expression than an extra divider.
Look at the balance between the eyes, mouth, and larger border before evaluating the short geometric marks. Keep the spacing around the face consistent in a simplified study. Compare a separate copy with fewer internal divisions if the face loses its expression on the smaller proof.
Check a plain-paper print at actual size
On the sized proof, cover the crown and chin with a blank strip, then compare the two eyes and the white opening inside the smile. If one eye appears filled in, inspect its narrow ring against the PDF at the same size. A clear PDF and a clogged print call for a second proof before redrawing. If both versions show the collision, use the edit to clear one adjoining edge, then uncover the rest of the face and check that the new gap still looks balanced.
For a single sheet, check that both sides of the crown and the bottom curve of the chin have room inside the printable area. A missing fan tip can resemble a deliberate change to the silhouette. If the face needs multiple sheets, choose a seam away from the eye rings where the layout permits. When a seam does cross the face, align the long cheek bands through the repeated area before checking the shorter lines around the mouth. See the actual-size printing guide for calibration and page alignment.
Keep a record of the direction and the chosen draft
Label the sheet with the crown at the top and the mouth below the two eye rings. If two drafts use the same outer shape, give each a label that names the change, such as open crown or simpler chin. Mark the edited area on a separate comparison copy so it remains visible when the drawings are stacked. Keep the full face in the version you share. A tight crop of an eye or jaw can make a local edit look like a different design.
 Tattoo Stencil
 Buy me a coffee