Motif background
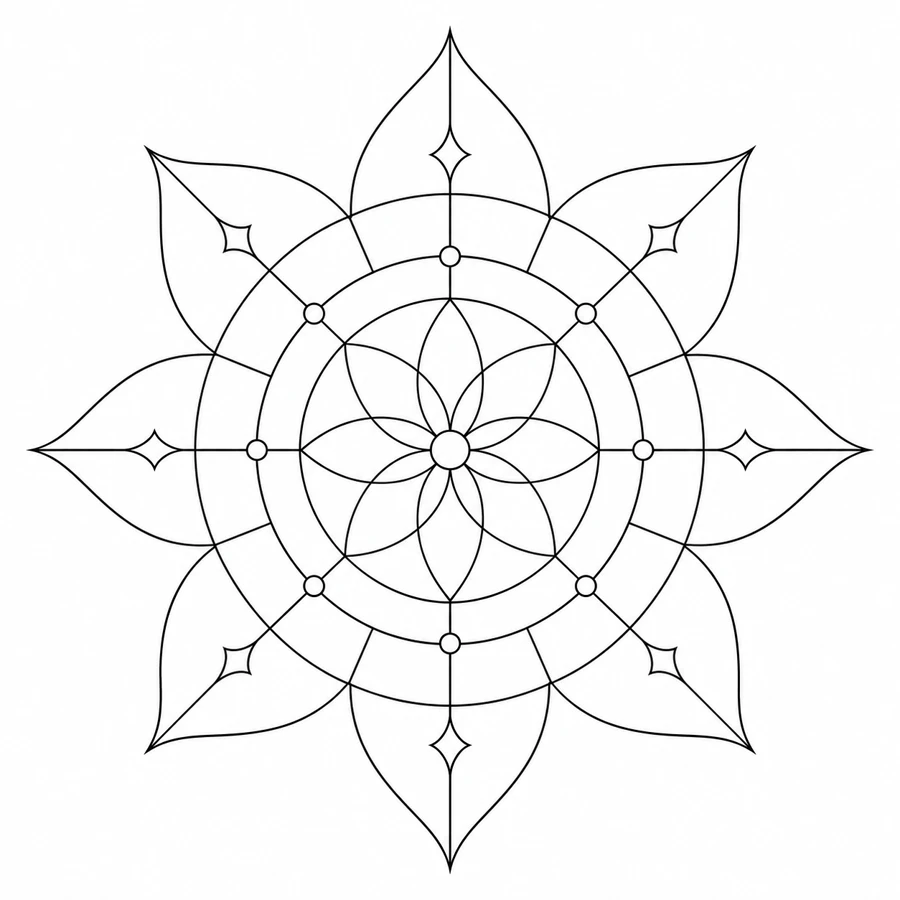
The word mandala has specific religious uses. The Met’s exhibition on Tibetan Buddhist art documents examples that depict the cosmos and have a devotional role. This illustration uses the word in its decorative sense. Its eight points, petals, and concentric circles are geometric devices for organizing a center and repeated intervals.
The Met on mandalas in Tibetan Buddhist art
Placement to compare
Mark the center of a paper shoulder mockup and rotate the disk so a point and then a gap sit on the main axis. Compare both orientations with the arm relaxed.
Linework and shading to discuss with your artist
Ask your artist to compare a consistent liner treatment for the circles with quieter marks in the smaller diamonds. The inner ring spacing is a useful check before adding dot shading or another row of detail.
Needle grouping terminology from Cheyenne
Plan the center before choosing the diameter
Eight points give this mandala a recognizable shape even when the center is viewed at a distance. The interior alternates curved petals with straighter lines and small diamond details. Compared with the Sun Medallion, whose rays frame a face with a fixed top, the mandala gives more freedom to choose which points sit on the main axes. A paper mockup with the center marked lets you rotate the whole design to see how a vertical point or a diagonal point relates to the edges of the space.
Decide whether the outer petals or the ring pattern should take most of the viewer’s attention. If you want the petals to lead, compare a draft with fewer small diamonds so the joins are less busy. If the concentric pattern is what drew you to the design, leave more space for that area and use the outer points as a quiet frame. When comparing widths, look at opposite sides together. A tight area on one side can make an otherwise centered pattern appear to pull toward that edge.
Compare the shape at the size you plan to use
Use a paper template with the center, the opposite tips, and a horizontal line marked through the middle. Place the mandala in the frame and note which tips approach the edges first when the template rotates by one eighth of a turn. On an upper-arm or shoulder mockup, look at the full diameter from the viewing angle that matters to you. Allow room around the tips before increasing the center detail. A cropped outer point can make the surrounding geometry look offset even when the center stays fixed.
A comparison checklist for Radial Mandala
- Check the distance from the center to the tip of each of the main points.
- Compare the closest concentric rings where they pass near the petals. Remove a secondary ring in a separate study if the gap closes.
- Keep the center marked on both drafts so you can compare rotational alignment separately from width.
Trace one of the eight sectors on thin paper and place it over the sector opposite it, using the center as the common point. Watch where the petal shoulders and the little diamond corners diverge. On a separate draft, reduce the interior of one diamond while leaving its neighboring ring intact. Compare the draft with the complete pattern before repeating the edit around the circle. A useful simplification keeps the rhythm across sectors as well as clearing a crowded junction.
Decide which details belong in the linework
Inspect a junction where a narrow diamond meets a ring. Follow the ring on either side of that junction and check that its curve reads through the interruption. If the small diamond makes the join too dense, test keeping the ring as a continuous outline and reducing the diamond to its simplest shape. Compare opposite junctions on the same draft before changing the whole set. The outer petals carry the repeated rhythm, so preserve their ends while deciding which smaller marks are worth keeping.
Mark the central axis or point of symmetry in your notes before measuring. Look at the smallest repeating interval in the design. If rings, rays, or arcs nearly touch, compare the same interval at opposite sides of the proof. Keep the spacing consistent when simplifying a repeated element.
Check a plain-paper print at actual size
Pick two opposite diamonds on the 100% proof and use them to compare how clearly the corners separate from the ring. Turn the sheet halfway around and see whether the weaker junction remains on the same part of the drawing. If the corners stay cramped on both sides, compare a simplified center with the outer diameter held constant. If only one area looks rough, inspect that area on a second copy before changing all eight repeats. Use the same paper and settings for both comparisons.
Keep the tips of all eight points within the printable area when checking a one-piece proof. For a larger version, line up the ring where it appears on both sides of the overlap, then check the distance from the center to a pair of opposite tips. If the distance looks inconsistent after assembly, check for an offset where the rings meet before changing the geometry. The outer tips give a wider reference than a single small petal beside the seam. See the actual-size printing guide for calibration and page alignment.
Keep a record of the direction and the chosen draft
Put a small mark above the point you want to face up and carry it over to the separate paper mockup. Keep the center marked as well so a rotated comparison stays at the same placement. If you tried a cleaner diamond or simplified a ring junction, note which detail changed and whether you applied it to one sector or all eight. Send the overall diameter and the complete circle along with any cropped detail used to show the change.
 Tattoo Stencil
 Buy me a coffee